Recorder
Setting up your rpi
These instructions use raspbian but any linux distro that is known to run on the rpi should work fine as long as it ships with python 3.7.
General reference installation instructions are available at the raspberry pi site.
This document focuses on the specific steps required to get the recorder running.
Initial Installation
1) Download the raspbian lite image
2) Write the image to your SD card
3) Reinsert the SD card, your operating system should spot there are 2 mountable "drives", mount the "boot" drive
4) To avoid needing a monitor and keyboard, enable SSH and the wireless network using the instructions provided, this involves creating 2 files on that boot drive
ssh: this file must be empty-
wpa_supplicant.conf: this file should contain the following content replacing the following values with your actual details- country
- ssid
- psk
country=GB
ctrl_interface=DIR=/var/run/wpa_supplicant GROUP=netdev
update_config=1

network={
   ssid="NETWORK-NAME"
   psk="NETWORK-PASSWORD"
}
5) Assemble your rpi and boot it up
6) Find the IP address of the rpi, there are 2 main ways to do this
- use nmap and scan the network
- login to your router and look in the DHCP address table
7) Connect to the rpi via SSH, login as pi (default password is raspberry)
Configuring the raspberry pi
1) Launch raspi-config
- choose option 1: to provide access to the entire sd card
- choose option 2: change your password & hostname to something memorable
- choose option 7: enable i2c
2) (Optional) Configure your rpi for passwordless ssh access
3) Encrypt your wifi password
- enter the following command
$ wpa_passphrase <your ssid>
- now type your wifi password in
- it will then output something like
network={
        ssid="yourssid"
        #psk="yourplaintextpassword"
        psk=d78685606adfa3f9e1e85f156c4914a31cde0652736d1c95dada5d6f4c031f88
}
- replace the psk value in
/etc/wpa_supplicant/wpa_supplicant.confwith the above
5) (Optional) Allocate a static IP to your rpi and add it to your hosts file on your main PC
6) Now reboot your rpi and check everything still works
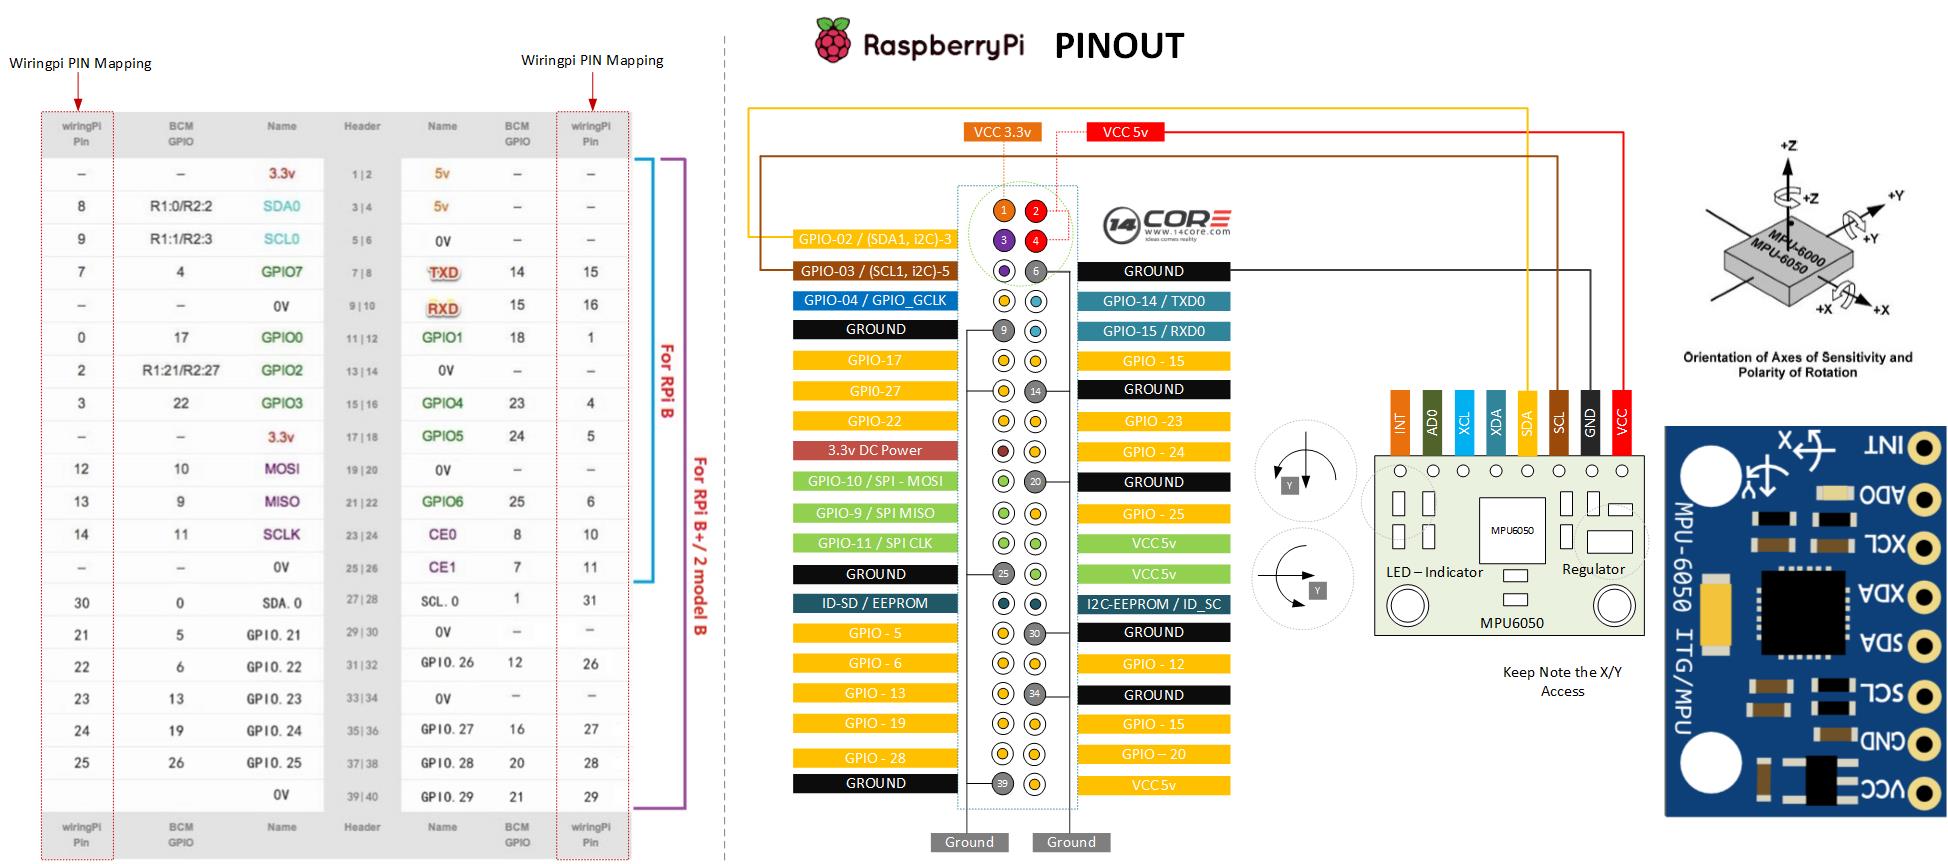
Wiring up the MPU6050
1) Shutdown the raspberry pi by executing sudo poweroff
2) connect your MPU6050 wiring as shown in this example
-
the sensor connects to GPIO pins 3-6 which means the 2nd and 3rd row of pins with connections from/to:
- pin 3 : SDA
- pin 4 : VCC
- pin 5 : SCL
- pin 6 : GND
3) boot up
4) install i2c-tools:
$ sudo apt install i2c-tools
5) run the following command, the results should match
$ i2cdetect -y 1
     0  1  2  3  4  5  6  7  8  9  a  b  c  d  e  f
00:          -- -- -- -- -- -- -- -- -- -- -- -- --
10: -- -- -- -- -- -- -- -- -- -- -- -- -- -- -- --
20: -- -- -- -- -- -- -- -- -- -- -- -- -- -- -- --
30: -- -- -- -- -- -- -- -- -- -- -- -- -- -- -- --
40: -- -- -- -- -- -- -- -- -- -- -- -- -- -- -- --
50: -- -- -- -- -- -- -- -- -- -- -- -- -- -- -- --
60: -- -- -- -- -- -- -- -- 68 -- -- -- -- -- -- --
70: -- -- -- -- -- -- -- --
Installing vibe-recorder
ssh into your rpi and:
$ ssh pi@myrpi
$ sudo apt install python3 python3-venv python3-pip libyaml-dev
$ mkdir python
$ cd python
$ python3 -m venv qvibe
$ cd qvibe
$ . bin/activate
$ pip install qvibe-recorder
an assortment of text will scroll past while it downloads and installs the recorder along with its dependencies.
The following error may scroll past along the way
 Running setup.py bdist_wheel for qvibe-recorder ... error
  Complete output from command /home/pi/python/qvibe/bin/python3 -u -c "import setuptools, tokenize;__file__='/tmp/pip-install-d92goxlg/qvibe-recorder/setup.py';f=getattr(tokenize, 'open', open)(__file__);code=f.read().replace('\r\n', '\n');f.close();exec(compile(code, __file__, 'exec'))" bdist_wheel -d /tmp/pip-wheel-6dmfl2iq --python-tag cp37:
  /home/pi/python/qvibe/lib/python3.7/site-packages/setuptools/dist.py:475: UserWarning: Normalizing '0.0.1-alpha.1+dirty' to '0.0.1a1+dirty'
    normalized_version,
  usage: -c [global_opts] cmd1 [cmd1_opts] [cmd2 [cmd2_opts] ...]
     or: -c --help [cmd1 cmd2 ...]
     or: -c --help-commands
     or: -c cmd --help

  error: invalid command 'bdist_wheel'

  ----------------------------------------
  Failed building wheel for qvibe-recorder
  Running setup.py clean for qvibe-recorder
Failed to build qvibe-recorder
Installing collected packages: pyyaml, smbus2, idna, hyperlink, attrs, setuptools, six, PyHamcrest, incremental, Automat, constantly, zope.interface, twisted, qvibe-recorder
It is normal behaviour and can be ignored.
It should eventually report success like
  Running setup.py install for qvibe-recorder ... done
Successfully installed Automat-0.7.0 PyHamcrest-1.9.0 attrs-19.1.0 constantly-15.1.0 hyperlink-19.0.0 idna-2.8 incremental-17.5.0 pyyaml-5.1.2 qvibe-recorder-0.0.1a1+dirty setuptools-41.2.0 six-1.12.0 smbus2-0.3.0 twisted-19.7.0 zope.interface-4.6.0
To verify, run the following command and you should see the subsequent output
$ ./bin/qvibe-recorder
  Loading config from /home/pi/.qvibe/qvibe-recorder.yml
  2019-09-20 20:50:58,465 - qvibe.app - WARNING - create_device - Loading smbus 1
  2019-09-20 20:50:58,502 - qvibe.app - WARNING - create_device - Loading mpu6050 mpu6050/500
  2019-09-20 20:50:58,517 - qvibe.mpu6050 - WARNING - set_accelerometer_sensitivity - Set accelerometer sensitivity = 2.0
  2019-09-20 20:50:58,521 - qvibe.mpu6050 - WARNING - set_gyro_sensitivity - Set gyro sensitivity = 500.0
  2019-09-20 20:50:58,527 - qvibe.mpu6050 - WARNING - set_sample_rate - Set sample rate = 500.0
  2019-09-20 20:50:59,096 - qvibe.mpu6050 - WARNING - set_accelerometer_sensitivity - Set accelerometer sensitivity = 2.0
  2019-09-20 20:50:59,100 - qvibe.mpu6050 - WARNING - set_gyro_sensitivity - Set gyro sensitivity = 500.0
  2019-09-20 20:50:59,108 - qvibe.accelerometer - WARNING - run - Running
  2019-09-20 20:50:59,129 - qvibe.mpu6050 - WARNING - set_accelerometer_sensitivity - Set accelerometer sensitivity = 2.0
  2019-09-20 20:50:59,134 - qvibe.mpu6050 - WARNING - set_gyro_sensitivity - Set gyro sensitivity = 500.0
  2019-09-20 20:50:59,138 - qvibe.mpu6050 - WARNING - set_sample_rate - Set sample rate = 500.0
Press CTRL+C to exit and move onto the next step.
Starting qvibe-recorder at boot
Create a systemd service to ensure the recorder is always running.
1) Create a file qvibe.service in /etc/systemd/system/ (location may vary on other distros)
    [Unit]
    Description=qvibe recorder
    After=network.target

    [Service]
    Type=simple
    User=pi
    WorkingDirectory=/home/pi
    ExecStart=/home/pi/python/qvibe/bin/qvibe-recorder
    Restart=always
    RestartSec=1

    [Install]
    WantedBy=multi-user.target
2) enable the service and start it up:
    $ sudo systemctl enable qvibe.service
    $ sudo service qvibe start
    $ sudo journalctl -u qvibe.service

    -- Logs begin at Thu 2019-09-19 22:17:02 BST, end at Fri 2019-09-20 20:53:02 BST. --
    Sep 19 22:30:28 grimlock systemd[1]: Started qvibe.
    Sep 19 22:30:39 grimlock qvibe-recorder[412]: Loading config from /home/pi/.qvibe/qvibe-recorder.yml
    Sep 19 22:30:39 grimlock qvibe-recorder[412]: 2019-09-19 22:30:39,421 - qvibe.app - WARNING - create_device - Loading smbus 1
    Sep 19 22:30:39 grimlock qvibe-recorder[412]: 2019-09-19 22:30:39,469 - qvibe.app - WARNING - create_device - Loading mpu6050 mpu6050/500
    Sep 19 22:30:39 grimlock qvibe-recorder[412]: 2019-09-19 22:30:39,482 - qvibe.mpu6050 - WARNING - set_accelerometer_sensitivity - Set accelerometer sensitivity = 2.0
    Sep 19 22:30:39 grimlock qvibe-recorder[412]: 2019-09-19 22:30:39,487 - qvibe.mpu6050 - WARNING - set_gyro_sensitivity - Set gyro sensitivity = 500.0
    Sep 19 22:30:39 grimlock qvibe-recorder[412]: 2019-09-19 22:30:39,492 - qvibe.mpu6050 - WARNING - set_sample_rate - Set sample rate = 500.0
    Sep 19 22:30:40 grimlock qvibe-recorder[412]: 2019-09-19 22:30:40,060 - qvibe.mpu6050 - WARNING - set_accelerometer_sensitivity - Set accelerometer sensitivity = 2.0
    Sep 19 22:30:40 grimlock qvibe-recorder[412]: 2019-09-19 22:30:40,065 - qvibe.mpu6050 - WARNING - set_gyro_sensitivity - Set gyro sensitivity = 500.0
    Sep 19 22:30:40 grimlock qvibe-recorder[412]: 2019-09-19 22:30:40,072 - qvibe.accelerometer - WARNING - run - Running
    Sep 19 22:30:40 grimlock qvibe-recorder[412]: 2019-09-19 22:30:40,096 - qvibe.mpu6050 - WARNING - set_accelerometer_sensitivity - Set accelerometer sensitivity = 2.0
    Sep 19 22:30:40 grimlock qvibe-recorder[412]: 2019-09-19 22:30:40,101 - qvibe.mpu6050 - WARNING - set_gyro_sensitivity - Set gyro sensitivity = 500.0
    Sep 19 22:30:40 grimlock qvibe-recorder[412]: 2019-09-19 22:30:40,108 - qvibe.mpu6050 - WARNING - set_sample_rate - Set sample rate = 500.0
    Sep 19 22:30:42 grimlock qvibe-recorder[412]: 2019-09-19 22:30:42,324 - qvibe.mpu6050 - WARNING - get_fifo_count - FIFO Count: 66
    Sep 19 22:30:42 grimlock qvibe-recorder[412]: 2019-09-19 22:30:42,368 - qvibe.mpu6050 - WARNING - get_fifo_count - FIFO Count: 132
    Sep 19 22:30:42 grimlock qvibe-recorder[412]: 2019-09-19 22:30:42,397 - qvibe.mpu6050 - WARNING - get_fifo_count - FIFO Count: 90
3) reboot and repeat step 2 to verify the recorder has automatically started